Summary
I helped the artist improve his workflow by adding tools developed using blueprints. I didn't notice many changes in the systems from my previous UE4 experience, probably because I didn't have to explore its depth too much. This experience has shown my growth and I was able to more comfortably assist the author's efforts in bringing to life the project.
Specifications
- Helped developing blueprints
- Developed in Unreal Engine 5 Alpha
- 3D Environment
Project goals
- Support the artist work by developing blueprints to speed up the environment's development
- Get in touch with the differences between UE4 and UE5
Introduction
Hi, my name is Matteo Graizzaro, a mostly C# coder with some knowledge of other stuff. I'm currently employed as a Junior Game Developer in a mobile game company called Whatwapp, and sometimes, after my daily shift, I like to help my brother, a 3D artist, with his Unreal Engine projects. I already gave him a little support for a previous project, developing blueprints involving Splines, UI, and more, but you can read about it in my other breakdown, and don't forget to go admire his art piece art piece.
This time things will be simpler, but no less challenging.
Let's begin!
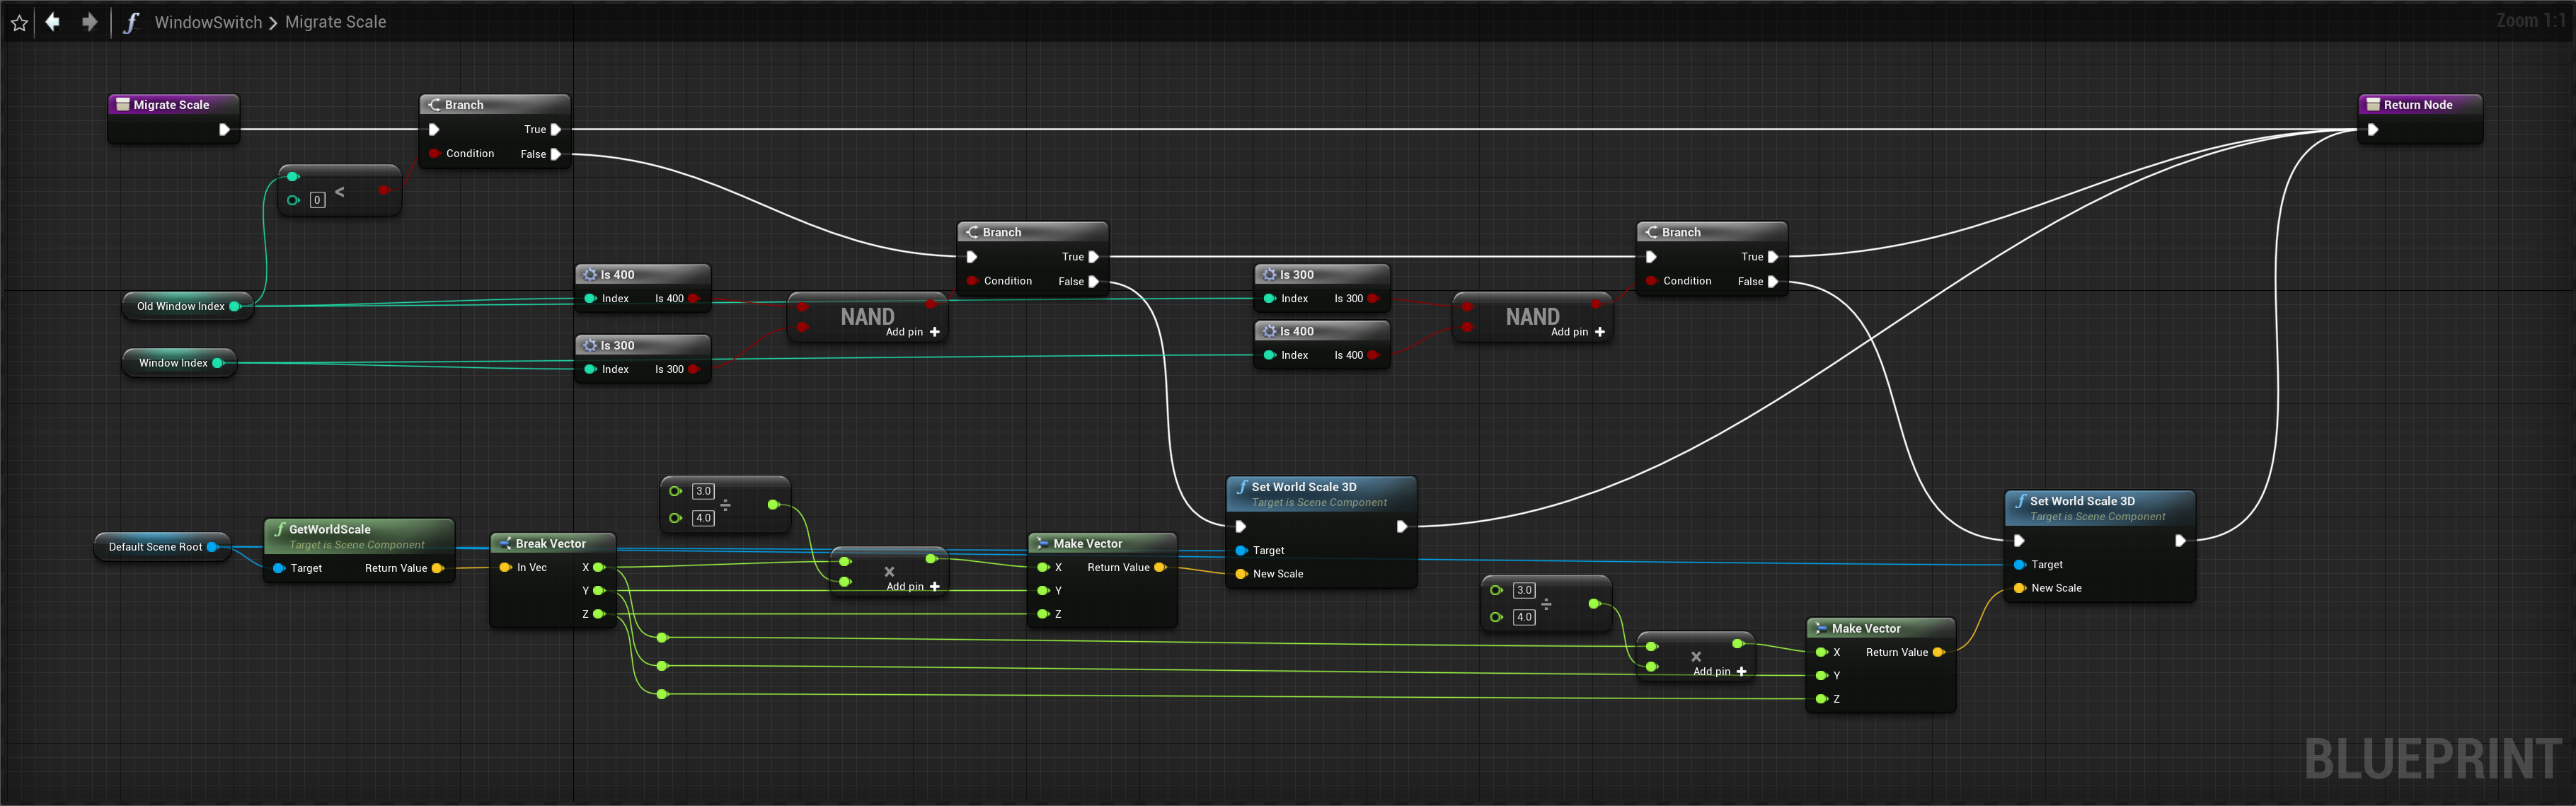
As I entered the project all the changes in the level were made manually by the artist, one being the substitution of the windows meshes to test different wall compositions. Therefore, as a first task, I developed a small tool that using a slider allows the artist to quickly switch between the different meshes loaded in an array.

Till now pretty straightforward, but things got tricky when switching windows whose sizes had different ratios. Luckily, the artist helped me by limiting the ratios to just two: 300x300 and 400x300. There is also a 500x300, but I wasn't able to handle that case and in accord with the artist I just ignored it.
To allow a mesh to fit in the same space previously occupied by a smaller or bigger mesh, I save the index of the current mesh, so when it is changed and the constructor is triggered, I can detect if the rate has changed and use a conversion ratio (in this case 3/4) to reduce or increase the scale of the actor. Unfortunately adding this additional variable was the only solution I found to the problem of not knowing which parameter has been edited when the constructor is called.
Roof generation
The most complex blueprint I had to work on so far in this project, has been the one responsible to handle the most common element in the entire environment... the roofs.
I started by asking the artist to explain to me the behavior he expected the tool to have, to extrapolate what I should have exposed as customization options, and after some back and forth I can summarize our conclusions with something around this line:
Generate a roof given length & height, and to be able to toggle both wings' visibility indipendently. It also needs a gutter.
We can identify the following 7 features the blueprint must have:
The basics, a line
A roof is constituted by a top and two wings (not their technically correct labels, it is just how I called them in the project).
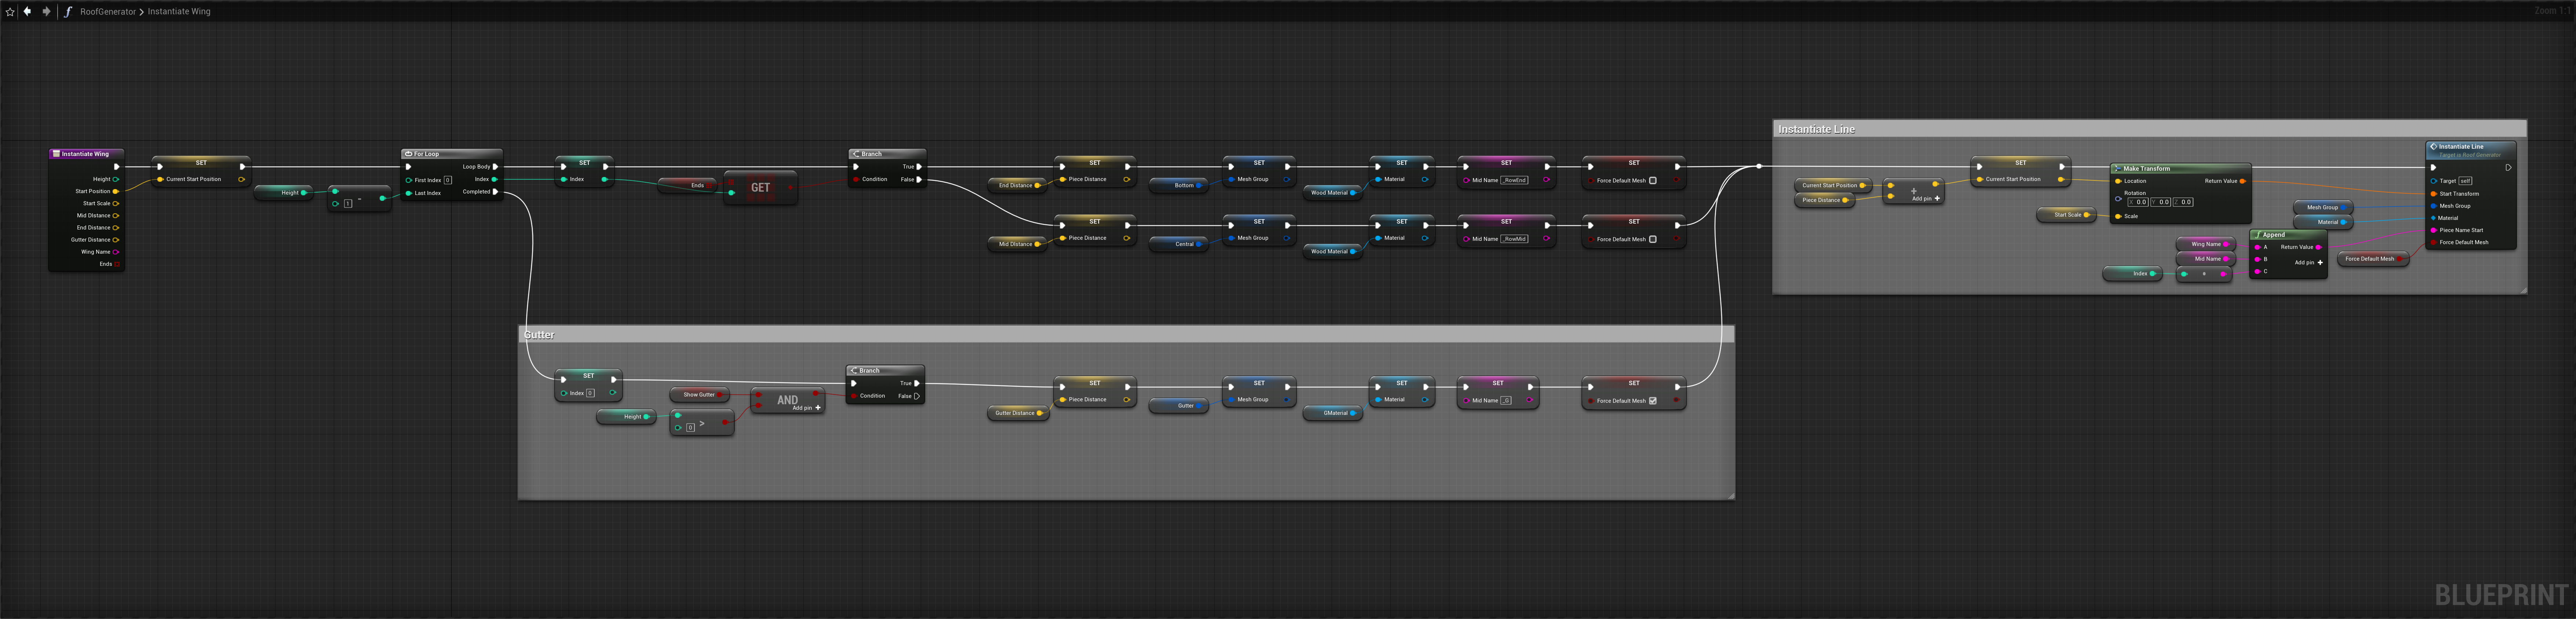
Having established this, I started developing a way to generate the top (the central spine), by instantiating meshes in a line according to a predefined sequence of meshes using an Instanced Static Mesh Component, to improve the performance as much as I was able.
- Length 3: 1 End - 1 MiddleA - 1 End
- Length 5: 1 End - 2 MiddleB - 1 MiddleA - 1 End
- Length 8: 1 End - 5 MiddleB - 1 MiddleA - 1 End
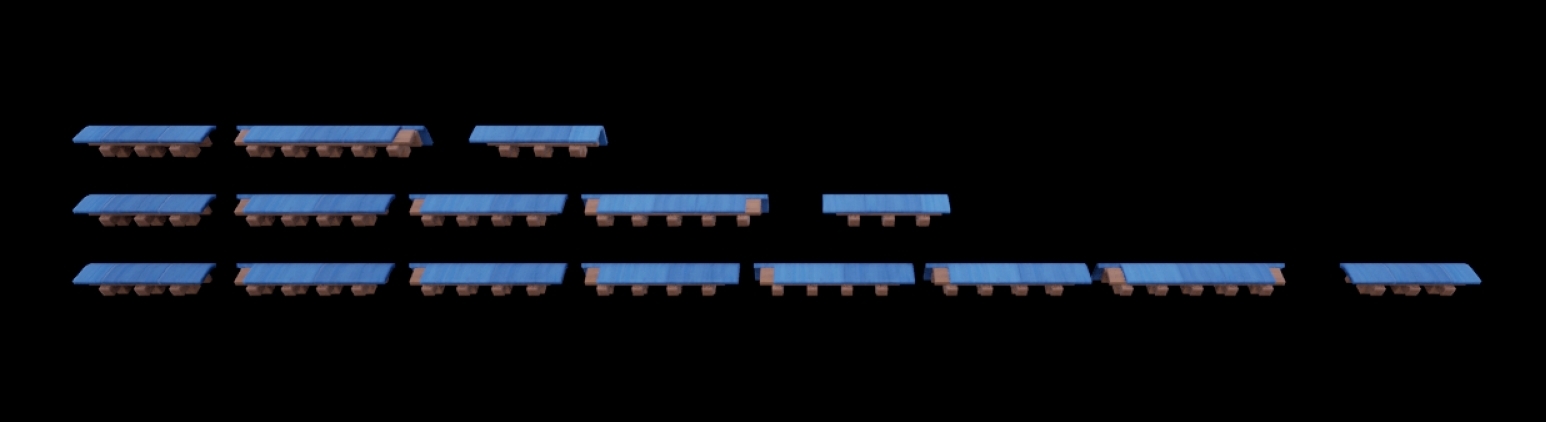
The meshes I had to work with where grouped into trios composed by: an End, a MiddleA and a MiddleB. From what you can see from the examples, the purpose of the MiddleA is to connect an End to a MiddleB or another End, and it is always the second to last piece. Meanwhile the MiddleB makes up the majority of a roof. The End is instead limited to the first and last piece, which has the particularity to be negatively scaled.

The advanceds, wings
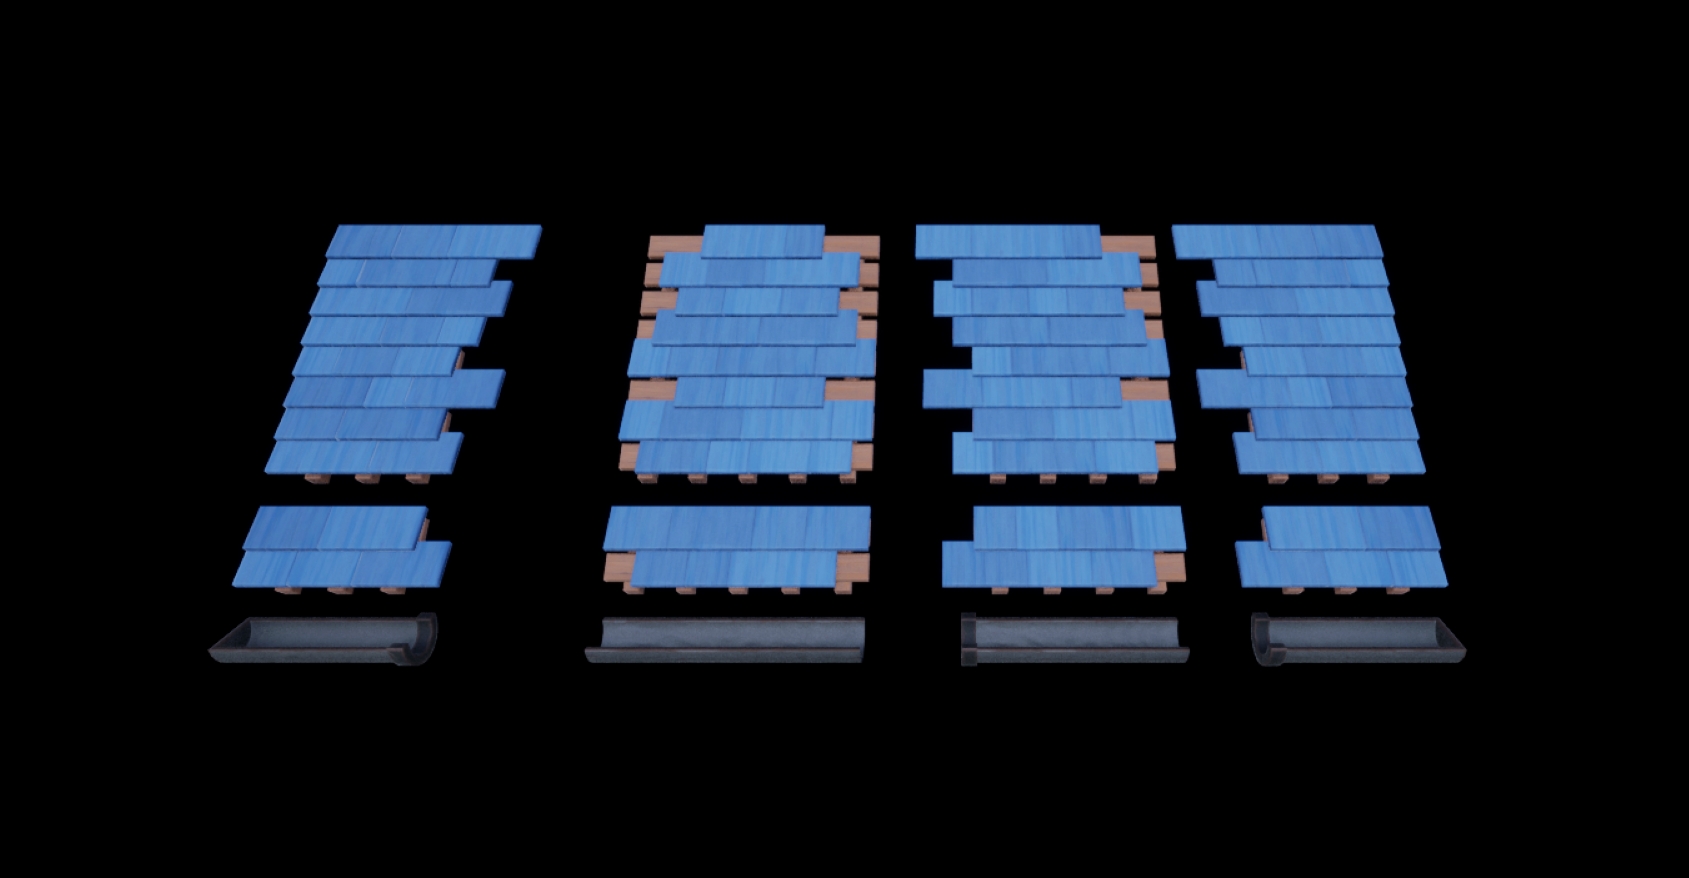
The wings were the biggest challenge due to being composed by many lines, each belonging to one of three types: large, small, and gutter. The image shows them in each possible combination. It was at this point that I simplified the code using a custom Structure to represent a single combination trio.
When building a wing I just had to proceed line by line, picking the correct trio based on the row (and other customization's options), and the correct piece on its column.
Final touches
After finishing most of the code I started putting in all the remaining customizations requested, some of which popped out later in the development, but at that point the blueprint was flexible enough to not needing too many edits to implement them.
Some, like the ability to mirror the wings (giving the priority to the right one), or to reset everything to the defaults, and various toggles, were simple enough. Others, like the ability support of vertex painting, made me spend a considerable amount of time in researching a solution, which turned out to be setting the Collision Object Type of the Static Mesh Components as World Static. It's surprising how, sometime, chasing a little thing can make waste so much time.
The more complex change was adding the freedom to edit some each generated mesh (to inject details such as windows), because I was forced to scrumble all the use of Instanced Static Mesh Components, due to the blueprint complexity becoming unmanageable, an issue I was already struggling thanks to all the unscheduled changes. I replaced the instantiating system with one based on a Static Mesh Component for each mesh, a solution I was sure was less performing, but way more simpler.
Surprisingly, later on, during one of his many explorations in the deep of performance improvements, the artist discovered that the majority of roofs were still grouped in a singular draw call even without using ISMCs. It was a big relief.
All the meshes are now included in a public map, using a string representing the mesh position in the roof as key, that served the double purpose to allow a more human-readable identification when editing them. Only problem I was not able to overcame, was the particular case when a parameter is changed making some of the customizations no longer appliable, and therefore forgotten. For example, if the length is reduced and they are beyond the new value.
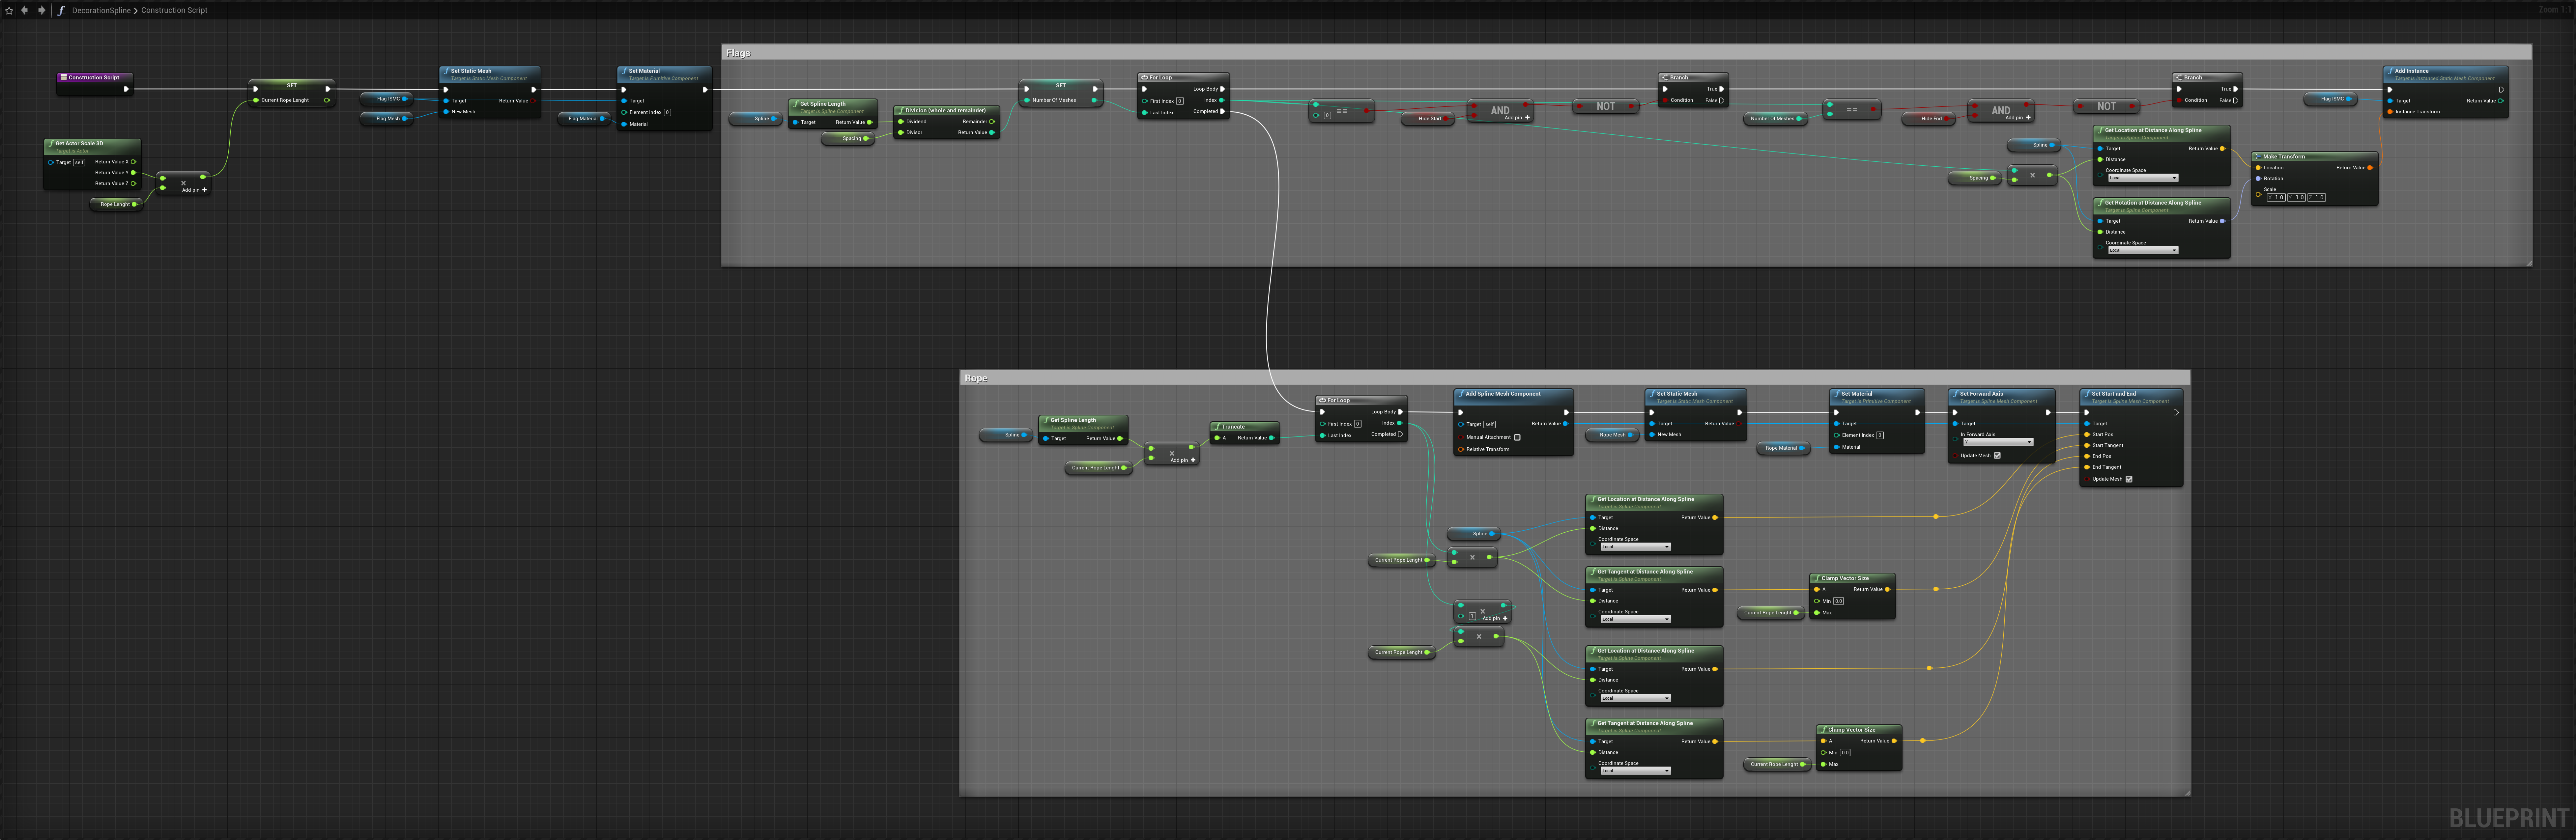
Decorations
During the project I also produced a couple of simpler and quicker blueprints.
For example, around the environment you can see some ropes adorned with colored triangles unfolding between the roofs. They are generated using a mesh instantiated along a spline, and other meshes placed at regular intervals.
I also tried to code a tool using C++ instead of the blueprints. The experience had been quite complex, being my first time using the programming language and coding something in Unreal. But I was able to put together the script, responsible to generate a simple fence given its total length and that of a section (the space between two poles).
Closing thoughts
Canals' Village is my second attempt ad lending a hand in producing an art piece using the Unreal Engine, 5 Alpha to bre precise so as to keep up with the times. With more experience and clear instructions I was able to develop blueprints to speed up the workflow that I, mostly, didn't have to refactor later.
The use of C++ gave me a hand sometime, but my lack of knowledge in Unreal Engine inner workings didn't allow me to make best use of it.
If I could go back in time I would:
- Design the systems to be more flexible and also consider edge-cases.
- Generalize some of the macros and functions to increase the rate of reusability.